Helpspot Sneak Peek 1 Request Page
There have been many requests for more details about HelpSpot so I'm happy to be starting a new series of posts offering a sneak peek into HelpSpot. From now until the initial beta launch I'll be posting inside looks at various features of HelpSpot. Some, like this post will be comprehensive looks at entire parts of the system while others will be small insights into unique tools and features.
Before I get started with the tour I just want to point out that the screenshots below are alpha quality. Some icons are missing or may change; some features may be adjusted before launch and so on. That said, 95% of what's here should be in the final product. I'd also like to encourage you to comment on what you see. Great ideas are always welcome!
Overview
The request page is an extremely important part of HelpSpot. It's the page where most users will spend the majority of their time. It's where requests are created, managed, and reviewed. As such an immense amount of functionality had to be incorporated into this page.
Beyond just making the required functionality available we really wanted to get the user interface right. So many other help desk management solutions crowd the page with dozens of form fields on this page even when most of these fields are never used on any one request. To combat this, we've combined some features, made some features popups, and used alot of in-page logic to fill in forms with only what the help desk staff member needs to see.
Let's take a look at an example of a request being managed. Here's the full screen view, we'll go through each piece below. (click image for large version):

Customer Information
Having access to customer information is absolutely essential to running a great help desk. We looked at a lot of models for working with this information before starting HelpSpot. What we found is that most help desk software either stores very little or attempts to store everything about a customer.
We didn't like either of these models; We wanted a clean interface that didn't require staff members to enter information that already exists in other systems. What we came up with is pictured below:
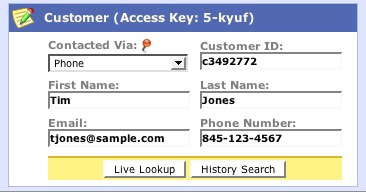
HelpSpot stores all the basic information about a customer you would need to answer a request as well as to provide request histories. However, sometimes you need more information than what we store to provide great customer service. To address this we came up with "Live Lookup".
The Live Lookup feature allows real time access to your customer information no matter where it's stored. Performing a Live Lookup for a customer can return any information about that customer you have in your IT systems. For example, you might want to return information about a customers support contract status. If you're using HelpSpot to support internal users you could return physical locations, systems passwords, or a list of system access permissions. Best of all, since Live Lookup accesses your IT systems in real time the information is always up to date. There's no need to for laborious data synchronizations between HelpSpot and your other IT systems (for technical details how this works see below). Of course using Live Lookup is optional and HelpSpot works just fine using only the provided fields.
Request Details
This area is where HelpSpot makes its biggest departures from "traditional" help desk software. It may not look it, but there are some big "new ideas" here so let's go through them one by one.

Categories/Reporting Tags - In most help desk software categorization quickly becomes a no win situation. Almost all systems have huge category trees that limit assignment to only one category; requiring you to choose the "right" one from 70 possibilities. The result is that instead of using categories to convey information they simply get used as queues of requests.
So HelpSpot takes a different approach. Categories aren't nested in HelpSpot, they're single level, and are used to categorize requests into general areas. Once you've done that you now have the ability to add an unlimited number of "reporting tags" to any request. A unique set of reporting tags is associated with each category. Reporting tags are powerful because they allow for easy filtering and reporting like-requests by conveying information in a structured manner.
Let's look at the example above. Here I've categorized the request as technical support and selected the reporting tags: Installation trouble, PHP 4.3+, and Linux. The results of this are tremendous. First, it only takes a second or two for the initial staff member (or others) to select the tags. Second, the tags allow categorization at a more fine grain level than traditional categories. So here I've not just indicated that it's installation trouble, but also that the customer is running PHP 4.3 on Linux. Now other staff members on the request can instantly see that information without reading through all the history to find it. I'll also be able to run reports on how many tickets we've handled for customers in this configuration and so on.
Here's another cool example of the power the reporting tag can bring. Let's say you're using HelpSpot for back office IT support. As an administrator you want to track if the new super duper Xerox document management unit is having any trouble. Under your copier category you add a new tag for Xerox c343. Now any requests that come in about that unit get tagged. No more guess work about how many came in for it or having staff keep a separate Excel document to track these one off requests. With reporting tags you know exactly how many came in for it, who handled it, and how it was resolved.
Tracking specific items like this is just one area where I believe reporting tags will change the way your help desk works.
Assignment - This is another area where HelpSpot takes a different tact. All requests must be assigned to the help desk "inbox" OR a specific user (the users available for assignment are based on the category). There is no way to assign a request to a generic queue. Don't panic! This is a good thing. Requests assigned to generic queues inevitable fall victim to the "I thought you were working on it" syndrome. Forcing a single person to be responsible for answering the request or reassigning it simplifies the process and imparts a sense of ownership.
To help prevent one person from being overloaded, you can see the number of requests currently assigned to the user right next to their name. This helps keep things balanced, but at the same time gives the flexibility to still assign a request to someone if they are the only ones who can handle it.
Colors - This isn't specific to just this area of HelpSpot, but this is a good place to point it out. Help desk software is intrinsically a "high read" environment. There's simply alot of information that needs to be consumed by staff members, so we've put alot of time into thinking through ways to lower the amount of reading even if it's just a little bit. An effective approach is to use colors and images to give a quick understanding of the situation. In the screen shot directly above you can instantly see the request is urgent because the header has been turned bright red instead of it's normal blue. The minute this page loads it's easy to see the issue is urgent without any reading at all.
Request History
The request history is really the core of HelpSpot request tracking. The request history tracks everything that's happened to a request over the entire life span of the issue.
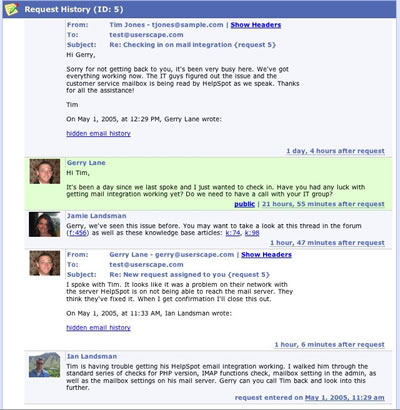
Order - The request history is shown in reverse chronological order, with the newest entry sorted to the top. This allows staff to quickly see the latest updates without having to scroll all the way to the bottom of the screen.
Photos - This is a unique feature which is again aimed at limiting the time necessary to identify who's working on this request. In an increasingly virtual workforce, it also gives a more "real" feeling to the online interactions.
Time - In most applications that track things over time they simply stamp the date and time next to the history event and leave it at that. When it comes to customer services however, we don't think that really conveys the information appropriately. So what we've done is display the date as the amount of time from the initial request. This has a couple of big benefits. First, it's easier to understand when each history event took place in relation to the initial request. Rather than just seeing 2 times it's much more beneficial to see that the request was updated 12 hours after the initial request came in.
The second big benefit is motivational. When you just see 2 times it doesn't really have the impact of seeing the distance of time. After you add a note to a request and you see that the time says 4 days and 6 hours after the request that really gives you an understanding of how long the customer has been waiting for a resolution. It makes the impact more real and we hope inspires staying those extra few minutes to respond to a customer or taking an extra few seconds to lookup the answer now instead of after lunch.
If you do need the exact time a note was added all you have to do is mouse over the time and it's shown to you.
Colors - Again HelpSpot uses color to quickly identify things. Above you can see that when a note is public it's green. This indicates that the note was emailed to the customer and it's also available via the online request tracking page in the portal.
Email Integration - HelpSpot integrates seamlessly with one or more email accounts. For example, keep you requests organized by having several support email accounts: support at example.com, passwords at example.com, printers at example.com. Emails from different accounts can be automatically assigned to a request category and even assigned to a specific user.
When sending emails to customers or other HelpSpot users the system will use these accounts and be able to keep a seamless flow of request events. If you look closely above you'll see that some of the notes in the request history came in via email. They integrate directly into the history of events in the proper time order. If the email is from a recognized HelpSpot user their picture is also displayed.
Best of all, since HelpSpot manages all the mail in the mailbox there's no more lost or forgotten email requests. Requests that come to your help desk via email are now tracked just like any other request so they never fall through the cracks.
Add a Note
Adding a note is super easy. Just type! Of course there are a bunch of optional things you can do, but we've tried to keep those out of the way until you need them. Here's a quick run down of how notes work:

Timer - The timer is great if your organization likes to track time on phone calls or needs to bill for time spent on requests. Simply start the timer when you begin a request and stop it when you're done. It will even keep the time if you forget to stop it and just submit the note.
Customer Update - Clicking on the customer update button makes the note public. You'll be able to send the note or update to the customer via email as well as track any replies as part of the request history.
Uploads - Easily upload an unlimited number of files into the request history. If you upload images those will be automatically embedded into the request history.
CC Staff - Many times to answer a request it's necessary to interact with other members of the support team. This usually takes place outside of the help desk software through email. With HelpSpot you can CC any staff member(s) on your note and their responses are automatically included in the request history. This keeps all the knowledge and interactions about the request in the system.
Append Prepared Responses - Prepared responses are simply bits of text that have been put into the system ahead of time to respond to fairly routine issues. When selecting to use this feature the response is appended to whatever text has already been written in the note. This feature will often be used with Customer Updates to provide email responses to customers.
Setting a Reminder
Reminders are a great way to be proactive about requests. Often when several people are involved in a request, or the request is time-sensitive it can be very beneficial to schedule reminders for yourself or others. These reminders are then emailed and/or text messaged to the recipients at the appropriate times. You can also view reminders in your workspace (sneak peek coming soon).
Next Update
This update covered just the highlights of the request page. Look for the next update in a few weeks. Feedback/comments are always welcomed. Please send remarks to ian AT userscape.com or comment below.
To stay in the loop on HelpSpot please sign up for our mailing list.
Technical Note
- How Live Lookup works is by making a simple HTTP or command line call to a script you create (or in many cases may already have). Your script accepts the information from the HelpSpot customer form and returns a simple XML document with ANY customer information you want to return. No limits. Pass back contract information, locations, system passwords or anything else. All the information in the document will be parsed and displayed to the staff member. Since HelpSpot is only requesting an XML document you can write your script in any language and can interface with any system.